Magnet Placement Basics: Understanding Pairs, Polarities and safety
Your beginner’s guide to using magnets for therapy the right way.
If you’re new to Biomagnetic Pair Therapy, one of the first things you’ll notice is that it isn’t just about placing magnets anywhere on the body. The effectiveness of the therapy relies heavily on precise placement, correct polarity, and understanding how different areas of the body are energetically linked. In this post, we’ll cover the fundamentals of safe, effective magnet placement, including: how to use polarities properly, why pairs are important, and the best practices for beginners.
What Is a “Biomagnetic Pair”?
In Biomagnetic Pair Therapy, a pair refers to two magnets placed on the body—one with the North polarity and one with a South polarity.
These pairs are placed on two specific areas of the body that are believed to be energetically or physiologically linked. The goal is to balance the pH between the two points, disrupting the conditions that allow viruses, bacteria, fungi, or parasites to thrive.
Understanding Magnetic Polarity
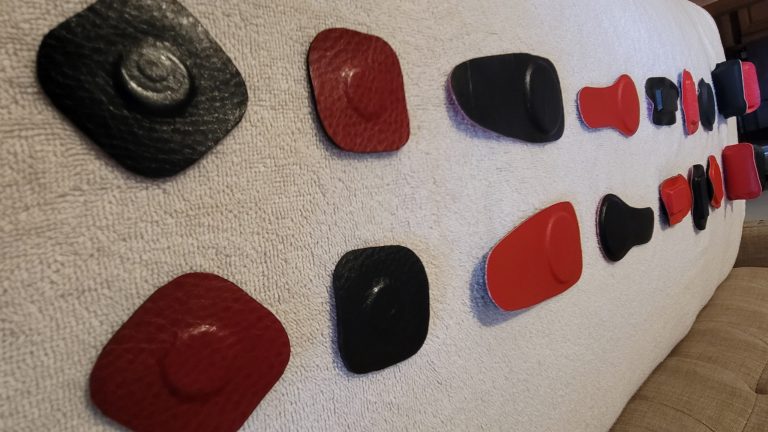
Most magnets used in Biomagnetic Pair therapy are color-coded: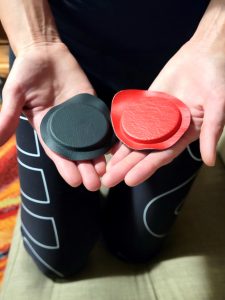
Black = Negative Pole (South)
Red = Positive Pole (North)
The black (negative) magnet is generally placed first, and on the area that needs alkalizing. The red (positive) magnet is placed second, typically on the corresponding area that needs acidifying. Together, this pairing aims to restore a neutral, balanced pH.

How to Place Magnet Pairs
Here’s a simple step-by-step breakdown:
1. Identify the Pair
Scan the body using muscle testing, like leg-length scanning, and a pair chart to determine which organs or areas are imbalanced. A commonly used example is: Liver ↔ Gallbladder
2. Place the South Magnet aka Black (Negative) Magnet First
Place the black magnet on the first location of the pair, in this case it would be the Liver point. Check the length of the legs to see if there has been a shift or if one leg has gotten shorter than the other.
3. Place the Red (Positive) Magnet
If you notice that the right leg has shifted that means there is an imbalance and you must then place the North side of the a magnet or the red side on the second point: the gallbladder.
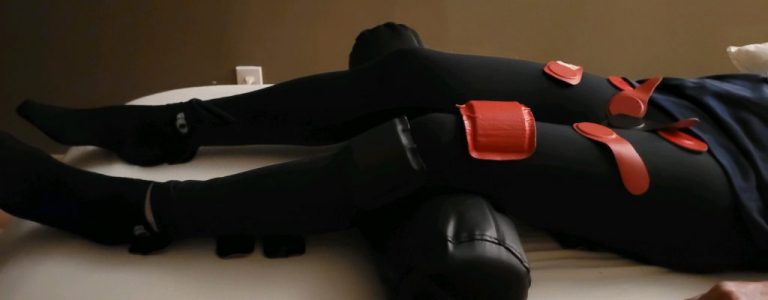
4. Secure the Magnets
Using paper medical tape, fabric bands, or clips secure the magnets on the body while the client lies still. Make sure magnets aren’t sliding or flipping.
5. Leave in Place for 15–30 Minutes
This is the typical window used by most Biomagnetic Pair practitioners to allow the magnetic field to take effect. don’t worry if the magnets are on longer than the allotted time, it will do no harm. When the time is up, check the leg length again and remove the magnets. Make sure the client hydrates and that you fill out a patient scanning sheet to record the information.
Safety Guidelines for Magnet Placement
While Biomagnetic Pair Therapy is generally safe, there are a few important rules to follow:
Avoid magnets near pacemakers or insulin pumps
Don’t use strong magnets near the head or heart without proper training
Avoid use on pregnant individuals unless certified in advanced protocols
Keep magnets away from electronics and credit cards
Always test magnets before use to ensure correct polarity (use a compass or polar tester)
Visit our Magnet therapy Safety checklist to download an easy to use Safety List. Remember that Biomagnetic Pair therapy should be used as a complementary therapy and is not intended to replace any medical treatment. Always consult with your doctor before trying any new therapy.

Best Practices for Beginners
Start with basic, well-documented pairs (like Kidney ↔ Bladder or Liver ↔ Gallbladder)
Use low to medium strength magnets (1,000–3,000 gauss)
Avoid placing magnets randomly—intentional placement is key to effective therapy
Allow the body to rest and hydrate after sessions to support detox and balance
If you are having trouble remembering the many different pairs or need help organizing you scanning points, try using one of our templates to keep you organized.
👉🏻 Download our Symptom Tracker or Scanning Log to help stay organized.
Helpful Tools for Accurate Placement
BMP Pair Charts – Printed or digital guides for common placement points
Session Logs – To record the pairs used, session date, and symptoms
Polarity Testers – To verify magnet sides
Anatomy Diagrams – Helpful when locating organs or muscle groups
Final Thoughts
Correct magnet placement is the foundation of effective Biomagnetic Pair Therapy. By learning how pairs, polarities, and safety principles work together, you can begin practicing with more confidence—whether you’re working on yourself, family, or clients.
Remember: intentional placement = better results. Take your time, use verified pair charts, and always listen to the body’s response.
Looking for a printable magnet placement chart or a beginner’s guide?
Visit our Tools & Resources Page to download helpful materials and shop our favorite products.